Quick Start Guide - Giva Service Management Suite™
Download our cloud help desk/customer service/call center application start guide to learn how Giva's intuitive, easy-to-use design can be deployed in just days and requires only one hour of training.
Discover Giva's help desk software ease of use and intuitive design in:
- Keyboard Shortcuts
- Homepage Navigation
- Ticket Grids
- My Charts
- New Knowledge
- Change Requests
- Notifications
- Quick Metrics
- Mini Charts
- Open VIP Tickets
...and more
Create Tickets & Search
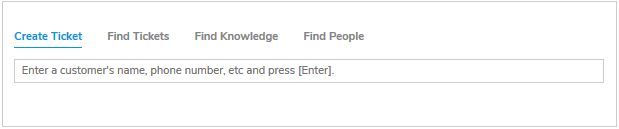
| Create Ticket tab | To create a ticket, enter a person or organization's name, phone number, or any combination and press [ENTER]. |
| Find Tickets tab | To find a ticket, enter a ticket number, person or organization's name and press [ENTER]. |
| Find Knowledge tab |
This tab is available if the Giva KnowledgeManager™ module is enabled.
To find a knowledge article, enter either a knowledge article number or keyword(s) and press [ENTER].
|
| Find People tab | To find a person or organization, enter the person or organization's name, phone number, or any combination and press [ENTER]. |
"How To" for Typical Actions
| Action | "How To" |
|---|---|
| Create New Ticket |
From the home page, click on the "Create Ticket" tab. Enter a person or organization's name, phone number, or any combination and press [ENTER]. Alternatively, in the top navigation, mouse over the blue "+" and select Ticket.
A Custom Profile Field can be created and configured to allow searching of any field to access a profile.
To retrieve an exact match of a phrase, put quotes (") around it.
The next screen will be a ticket. Select a Nature of Request, complete the Subject, select a Severity Level and other fields as necessary or required. Your configuration will determine which fields are displayed and required to create a ticket.
Press [CTRL] + [S] or click "Create".
|
| Find a Ticket |
Click on the "Find Tickets" tab on the home page or go to the search box in the upper right of any page. Enter a ticket number, person or organization's name and press [ENTER]. On the results page, use the panel on the right to refine the search, if necessary. Click on the person or organization's name to view the ticket history.
To retrieve an exact match of a phrase, put quotes (") around it.
|
| Complex Ticket Searches |
Perform more complex searches using the top navigation. Go to "Tickets -> Search Tickets by Issue or Customer". Enter keywords and narrow the search by selecting other criteria, as necessary.
To include an exact match of a phrase, put quotes (") around it. In the same phrase, to include a word, put a plus (+) in front of it, or if you want to exclude a word, put a minus (-) sign in front. Use "AND" and "OR" in between words or phrases to create search strings.
Alternatively, use the "Advanced Options" tab to make a very narrow search without using the plus (+) and (-) signs as above. In the first row enter all the words you want in the search results. The second row is for exact wording or a phrase. The third and fourth rows are for more complex searches. Use all rows at the same time, as necessary.
|
| View and/or edit Open Tickets |
It is easy to find open tickets by clicking on a widget on the home page.
Alternatively, in the top navigation, select Tickets -> All Open Tickets.
Configure the report by checking the "Show Filters" checkbox and selecting filtering criteria. Click on the column heading to sort any column.
|
| Find and Edit a Customer Profile |
Click on the "Find People" tab. Enter a person or organization's name, phone number, or any combination and press [ENTER]. A list of names may be displayed to narrow the search down to the correct customer. There are 3 vertical dots on the right. Mouse over the dots and select "Edit".
A Custom Profile Field can be created and configured to allow searching of a single profile field to access a profile.
To include an exact match of a phrase, put quotes (") around it.
|
| Add New People or Organizations to Giva | In the top navigation, mouse over the blue "+" and select People/Organization. Complete all required fields and follow the instructions. As an alternative, perform a bulk import or integrate your LDAP or any database with Giva by going to your name in the top navigation -> Administration -> Basic Set-up -> People (Agents, Customers, etc.). |
| Home Page Dashboard Widgets |
Giva's dashboard consists of small cards or widgets that come from a library of cards. The default layout shows some popular grids and charts, and is highly interactive and customizable. It is easy to find tickets by clicking on any number in a widget.
To add or remove widgets, click the "Add/Edit Widgets" button in the upper right side. There are many widgets available; charts, grids, knowledge articles, etc. Review a thumbnail of each widget by mousing over each item; check boxes as desired and click save. The widgets will appear on the home page and can be arranged in any order desired.
Mouse over the top of widgets to move, refresh, print, export or delete. Mouse over and/or click on a widget to get the data behind the chart.
Each Agent can have their own customized home page which is automatically saved for each device such as a computer or tablet.
|
| Run Reports |
In the top navigation select Reports -> All Reports. Review the reports under different tabs for each module. Customize reports using filters by checking the "Show Filters" checkbox. Select the appropriate format to download reports into CSV or PDF formats. Reports can be named, saved and shared by clicking, "Save Report As".
On any report that has columns, click on the column heading to sort the report.
The top navigation menus display some reports. Other reports can also be added. To add a report to the top navigation menus, make the report a "Favorite" in the Reports section by clicking on the gold star next to the report title and refresh the page.
Alternatively, from the home page dashboard, mouse over and/or click on a widget to get the ticket data behind the chart. On the right side, mouse over the vertical three dots to print the content.
|
| Find Knowledge Article |
On the home page, click on the "Find Knowledge" tab or go to the search box in the upper right of any page. Enter a knowledge article number or search criteria using words or phrases and press [ENTER]. To include an exact match of a phrase, put quotes (") around it.
Perform more complex searches using the top navigation by selecting "Knowledge -> Search Knowledge". Use the "Advanced Options" tab to narrow a search as discussed above.
|
| Create a Knowledge Article | From the top navigation mouse over the blue "+" and select Knowledge. Complete all required fields. |
| Access FAQ & Most Frequently Used | From the top navigation select Knowledge -> FAQ & Most Frequently Used. |
| Emergency Event |
Step 1: Consider Adding a Marquee Message to alert appropriate Service Groups of the emergency event. This is a message that scrolls like a ticker tape along the top of the application above the navigation. It can be viewed by Agents, and Customers if they log into the Self-Help Portal.
On the top right navigation select Alerts -> Marquee. Select "Add New Message", select Service Groups, type a message and select expiration date, if appropriate. Optionally, send an email with the Marquee Message to a group of people defined by your Administrator.
Step 2: If creating more than one ticket for this emergency event, then it is possible to link multiple tickets with the same category (i.e. Nature of Request). Once the tickets are linked, they all can be simply managed by accessing any of the linked tickets. Any linked ticket can be updated with a note and that note will be duplicated in all linked tickets. Also, any linked ticket can be closed, and this action will close all the linked tickets.
In the "Actions" section on the lower right of the ticket, check "Convert into a New Tsunami Event". Optionally, send an email with the details of the Tsunami Event to a group of people defined by your Administrator. Just leave checked the "Send Tsunami Notification".
To add people to the "Send Tsunami Ticket & Marquee Message Notifications" lists, go to your name in the top navigation -> Administration -> Tickets Tab -> Basic Set-up -> Business Rules & Notifications -> Notifications & Exception Lists.
|
| Add additional Tickets to an Emergency Event | When creating a new ticket, click the "Add to Tsunami" link in the red horizontal bar at the top of the ticket. Select appropriate Tsunami Event by verifying it with the brief description. |
| Add a Broadcast Message to Communicate with Agents and/or Customers |
From the top right navigation select Alerts -> Broadcast. The message can be targeted at specific service groups, and Customers if they log into the Self-Help Portal. Select "Add New Broadcast", select Service Groups and/or customers, type a message and select expiration date, if appropriate. Click "Save".
This is a message that people will see when logging into Giva.
|
| Print Tickets |
From the home page dashboard, mouse over and/or click on a widget to get the ticket data behind the chart. Click on a ticket number.
In the top navigation, select Tickets and click on any of the Reports in the menu.
Use the special [CTRL] + [ALT] + [P] keyboard shortcut to print your page. This will ensure your browser prints the entire contents of the page. Do not click the Print button in your browser or select File -> Print from the top of your browser.
|
| Create a Child Ticket |
A "Child" ticket is subsidiary to a "Parent" ticket. When creating a creating a Child ticket, the original ticket becomes the Parent ticket. For example, creating a few child tickets could be onboarding tasks to get a new employee or customer set-up.
Go to the ticket where you want to create a child ticket. In the "Actions" section on the lower right, click on the "Create child ticket" link. Complete all the required fields in the child ticket.
|
| Working with Nature of Request |
When viewing a ticket, click the double arrows on the end of the Nature of Request (NOR) menu. Next, mouse over the menu options to pick a nature of request. The menu can cascade for many levels.
Alternatively, to use the keyboard instead of the mouse, type a letter at the beginning of each menu item, or use arrow keys and the Enter key to navigate and select an item.
|
| CC Customer & Assignee |
When viewing a ticket, under the customer name on the right side, click "Add Customer CC". In the box, type at least 3 characters of a customer's name, and select the correct name. Multiple names can be added. The steps are the same for adding a CC assignee.
A customer can also be added to a public note. Type a note, make sure "E-mail this note to the customer" checkbox is checked, and in the CC field, type a name and then select it. Any customer CC is also automatically included in a public note CC. To remove a CC, just click the "X". Finally, click "Save" to save the ticket.
|
| Find Quick Resolutions |
When viewing a ticket, enter a Nature of Request, and then click the "Find quick resolution" link under the "Actions" section on the lower right. The tickets returned are the most recently closed tickets with the same Nature of Request.
Scroll through the resolutions to find the description that best matches the current problem, and then click the "Copy" link next to the best match. This will copy the resolution into the current ticket.
|
| Entering Time in a Ticket |
When creating or viewing a ticket, scroll down to the bottom of the "Actions" section on the lower right to the "Time Worked" box. Enter time using an hour/minute format as follows: 1h 30m, 1:30, 1.5 and click "Save".
Edit time worked by clicking the "View time worked" link under the "Actions" section on the lower right. Entries can be modified or deleted. Clicking "Save" immediately saves the updated information, so it is not necessary to click Save on the main ticket page.
|
| Duplicate or Copy a Ticket | In the "Actions" section on the lower right of a ticket, click on the "Duplicate Ticket" link. Select the new customer for the new ticket. An exact copy of the ticket will be created and displayed. Alternatively, in the "Actions" section click on "Copy ticket to clipboard". The information can be pasted into an email, document, etc. |
| Set Personal Preferences | In the top right navigation, select your name -> Personal Preferences. Carefully review options available to make sure that the system is optimized to meet your needs. |
| Get Help | In the top right navigation under your name, select "Get Help". A knowledgebase is available to assist with self-service. Click on the blue "Create Giva Support Ticket" button to create a Giva support ticket and complete the required fields. |
Keyboard Shortcuts (Hot Keys)
| [CTRL] + [ALT] + [K] |
Displays a list of all Giva keyboard shortcuts for the current page with a list of their descriptions.
Since there are so many different keyboard shortcuts available, this is the most useful shortcut to remember because it shows all shortcuts available on the current page.
Type Ctrl-Alt-K to get a list of available shortcuts for the current page.
Type Ctrl-Alt-T to create a ticket. Type Ctrl-Alt-P to print the page. Type Ctrl-Shift-R to view the Reports page. Type Ctrl-Shift-O to view the "My Open Tickets" report. On a ticket, there are many shortcuts that can quickly move the cursor to any of the ticket's tabs or fields.
NOTE: To ensure keyboard shortcuts work correctly, move the cursor focus away from any data entry boxes by either pressing the [TAB] key or clicking the mouse outside of the data entry box.
|